Choosing the Direction of Your Funnel
Let's use the following base as an example:

Since the town hall is in the exact center and the base is pretty symmetrical all around, it would seem like you could attack from any direction and it wouldn't really matter. But there are some considerations to take in mind when choosing where to strike from:
1) Strike to engage the clan castle troops early. The enemy's clan castle troops can be one of the toughest obstacles on a base, and it should always be dealt with head on. The base above should be attacked either from the top left or top right, or directly from the top to engage the enemy clan castle troops early when your army is at its strongest. Let's see what happens if we attacked this base from the bottom vs. from the top:
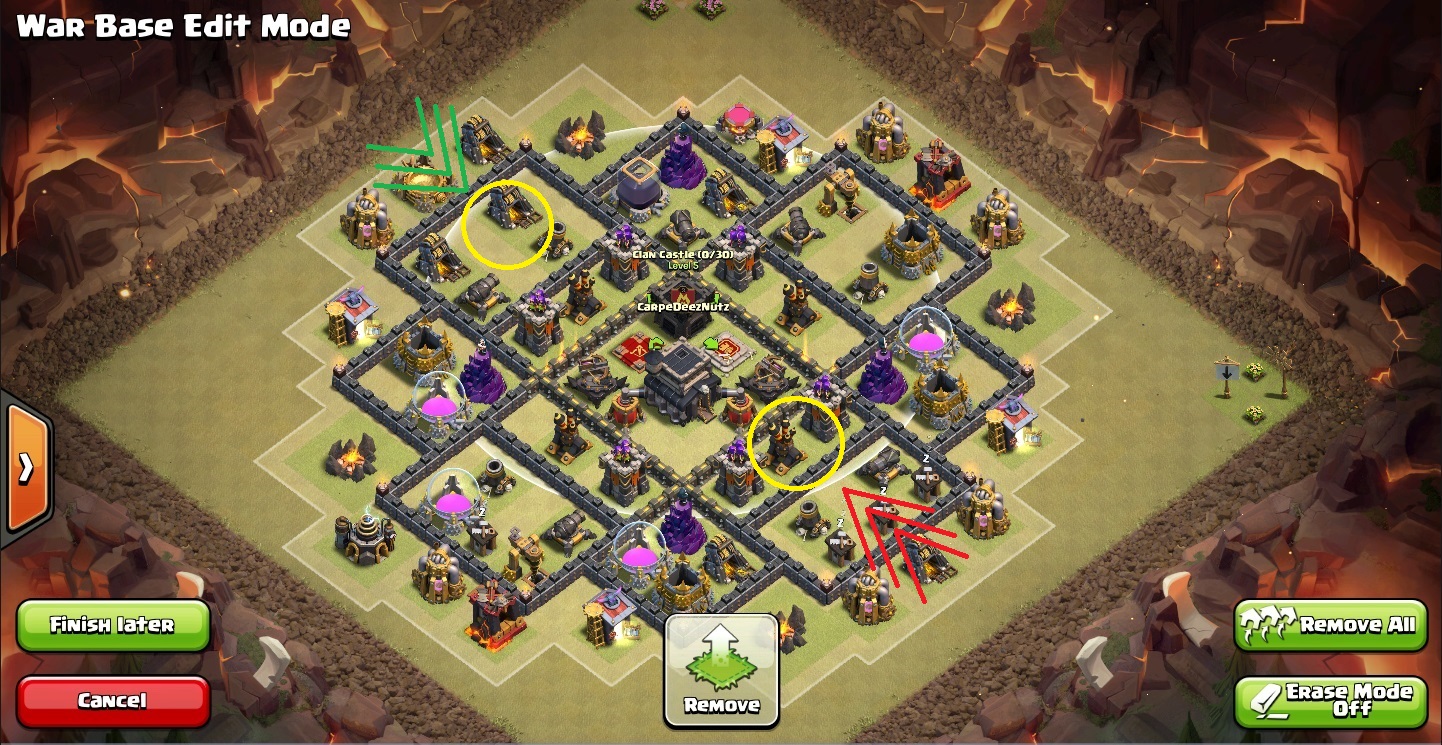
The clan castle's trigger range is indicated by the large faint white circle. When your troops enter that range, the enemy's clan castle troops will deploy to engage your troops. If you attack from the top left, indicated by the green arrows, the battle between your troops and the enemy clan castle troops will happen at the yellow circle. At this area, close to the perimeter of the base, nearby wizards used for funneling will likely be alerted and move towards the enemy's troops to fight them, helping to take them down faster. If you have a queen, she will likely be nearby at this stage too to help as well. Now, when you attack from the bottom right, a different story emerges. Your troops will enter the trigger range much later in the attack and deeper in the base. Any funneling wizards you first dropped may have veered off towards other perimeter buildings and are too far away to help, or may have been destroyed when they reached this deep into the base. If your queen did not funnel correctly (and she is very difficult to funnel), she may be attacking buildings along the perimeter and may also be too far away to help. If your kill squad was composed of valkyries or pekkas, and the enemy had a dragon in the base, it would relentlessly roast your valkyries or pekkas and your ground troops would be helpless to stop it. Always do your best to avoid this scenario, and fight the enemy clan castle early when you have the best chance of defeating it quickly.
2) Strike to destroy the enemy queen early (only at TH9 and above). The enemy queen is second behind the enemy clan castle in terms of deadliness to your troops. If you are planning a three-stage attack with hogs or balloons to clean up, the queen MUST be destroyed first. The queen will absolutely rip through hog or balloon armies, and she (and the clan castle) must always be destroyed first before deploying hogs or balloons. No exceptions to this. If hogs or balloons are a major component to your attack, the clan castle troops and queen must be eliminated first.
3) Strike the strongest side of the base first/the side of the base with the most defenses. Most attacks will start with golems being deployed first, and the golem's primary purpose is to act as a distraction to absorb enemy fire while your other troops rain damage down. If the enemy's base has an uneven distribution of defensive buildings (one side of the base may have more archer towers and cannons for example), then attack the strongest side first. Your golems will distract more defenses, which is what the golem was made for, and hopefully your wizards and kill squad will take out these defenses while they are slowly chiseling away at your golems. Your golems will often not travel far from where they are dropped, so it's very unlikely your golems will ever reach the back-side of the base to distract any defenses there. And your other troops are much faster, so they will probably be taking fire by defenses on the backside of the base way before your very slow golems get there. Attacking the strongest side first also leaves the back-side (the weaker side with fewer defenses) easier to take down with your third-stage troops, such as your hogs or balloons.
So in summary:
1) Strike to engage the clan castle troops early
2) Strike to destroy the enemy queen early (only at TH9 and above)
3) Strike the strongest side of the base first/the side of the base with the most defenses
Sometimes, a base will be designed where you can't follow all 3 of these rules. The enemy clan castle might be on the opposite side of where the queen is located, for example. When this happens, try to follow the rules in order of priority as best you can. One trick I also like to use to deal with this is to lure the enemy clan castle troops out with a giant or hog first, and then attack the queen side. The enemy's clan castle troops will move towards your battle at the queen side of the base and you can resume your attack normally from there. This technique sacrifices 5-10 troop space worth of troops (a giant or hog, sometimes two), but the technical advantage it provides can be well worth it. The following picture provides an example of how this is done:

The clan castle is north of the town hall and the queen is south of the town hall in the picture above. So a hog is first dropped at the top left, where it will seek out the nearest defense, either the cannon or mortar nearby. This hog will enter the range of the clan castle and the enemy's troops will come out and kill the hog. You then begin attacking from the south to destroy the queen, and the enemy troops will come down to you and you can deal with the queen and enemy clan castle at the same time.
Envisioning the Funnel
Now that we have a better understanding of what direction we want to attack from, we can now envision the best way to make our funnel. First, we must picture the path your troops will take around the perimeter if you do not make any attempt at funneling:

The green line shows the likely path your troops will take if you do not use any funneling techniques. They will destroy one building, then move on to the next in line around the perimeter. Now, let's decide a direction we want to funnel from. Let's say, we want to invade from the top left, to engage the enemy clan castle and queen head on:

Now, to make the funnel, we must break off several links on each side of the chain that surrounds the perimeter of the base.

The picture above shows how to make a simple, but effective funnel to attack from the top left. Just destroy a few links in the chain and your troops will have no choices but to move in rather than around your base. You'll notice that three buildings in the center of my intended funnel direction were not selected to be destroyed for the funnel. These buildings give your troops something to "latch" on to first before moving into the base. If I destroyed those three buildings first, then the kill squad would have likely tried to walk farther away to another perimeter building instead, like so:

If I destroyed those three buildings at the start of my funnel first, the kill squad would walk towards the army camp or barracks and would have continued the walk of shame. So remember to destroy a few buildings on either side of your funnel, but to leave some buildings in the center of your funnel intact so that your kill squad will have something to target and help guide it into your funnel.
When making a funnel, also consider that there are different sizes of funnels you can make. You can make a very narrow funnel with just a golem and 4 wizards, or you can make a very wide funnel with 2 golems and 5 or 6 wizards on either side. The advantage of a narrow funnel is that you have more army space dedicated to your kill squad. But the very wide funnel can help to prevent kill squad troops from walking out of a base and back to the perimeter. Valkyries usually require large funnels because they are prone to walking in and out of bases, but of course it can happen to pekkas as well. Each base must be examined individually to determine if it needs a wide funnel or if a narrow one will suffice, as some bases are much easier to funnel than others (the bases pictured above would be considered very easy to funnel).
Wizard Drop Direction
The direction and order you drop your funneling wizards will determine the flow of your wizards into or out of the funnel. Let's look at some examples:

Let's pretend I wanted to funnel the base above from the 12 o'clock position. I would drop my golems first (this should be a given by now. Golems before wizards, always) and I drop my wizards in the order indicated above. I drop them simultaneously on either side, with the first wizards closest to my funnel and each additional wizard being dropped further away from my funnel. Dropping it in this order will cause the wizards to drift outward, away from the funnel and out towards the other perimeter buildings:

Now, if I reverse the order and drop in the wizards from the far side moving in, the wizards will flow into my funnel as they destroy their buildings and move on:

By dropping the wizards in this order, they will flow into my funnel rather than away from it, and they will move with or behind the kill squad troops into the core of the base.
Now, is one method better than the other? No, it all depends on the layout of the base and what you want your wizards to do. If you want your wizards to move along the perimeter expanding the funnel, drop them from the inside of your funnel and drop them progressively outwards. Having wizards move away from the funnel can also be beneficial for destroying any defenses that happen to be along the perimeter, yet still distracted by your golem or potentially to be distracted by your kill squad as the attack progresses. If you want your wizards to move into the core of the base to back up your kill squad though, drop the wizards further from your funnel and drop each one progressively inwards towards your funnel.
The technique for controlling an inward or outward flow of your funneling wizards is not 100% precise. It works best when you drop them down in a slower, more controlled manner, with a half-second or full-second pause between each drop, rather than throwing them down super fast and almost instantaneously. It also works better if the health of the perimeter buildings your wizards are dropped next to are approximately the same. But nonetheless, this is a very fine detail that can really control the flow of your attack, so be sure to practice it and consider how you want your wizards to move as your attack progresses.
No comments:
Post a Comment