Came across an interesting new strategy that has been developed, using a valkyrie horde with healers and all freeze spells:
https://youtu.be/0GNbvxHIGCo
Saturday, April 30, 2016
Sunday, April 24, 2016
Troop and Spell Glossary
Even though we're all pretty familiar with all the troops and spells in the game, you may find some new or useful information from reading this. The attack and health ratings are based on how they stack up compared to all other troops in the game. They are not "official", but my personal ranking of the troops.
Troops
Barbarians
Attack: ★★☆☆☆
Health: ★★☆☆☆
Barbarians are a cheap, economical unit that's powerful in big numbers but vulnerable to wizard towers and mortars. They are good to use in loot raids, but not recommended for war. Their only good purposes in war are for luring clan castle troops and pulling them into different directions.
Archers
Attack: ★★☆☆☆
Health: ★☆☆☆☆
Dragons
Attack: ★★★★☆
Health: ★★★☆☆
High damage, high health troop. An essential war troop at TH8. The only true weakness a dragon has is to air defense buildings, which can take down dragons very quickly. Most dragon attacks revolve around eliminating as many air defenses as possible, and deploying dragons en masse to sweep the base. Dragons see much less use in TH9 and above, but they make excellent defense troops in the clan castle at all levels.
Troops
Barbarians
Attack: ★★☆☆☆
Health: ★★☆☆☆
Barbarians are a cheap, economical unit that's powerful in big numbers but vulnerable to wizard towers and mortars. They are good to use in loot raids, but not recommended for war. Their only good purposes in war are for luring clan castle troops and pulling them into different directions.
Archers
Attack: ★★☆☆☆
Health: ★☆☆☆☆
Archers are a cheap, economical unit that pairs well with barbarians or giants to help shield them from damage. Like barbarians, they are primarily a raiding troop and not a war troop, but they can be used for troop luring, funneling, or picking off lone builder huts in war. They can be used to kill enemy clan castle troops effectively by luring them out to a safe area, dropping a poison on them, and quickly encircling a large number of archers around the enemy's troops.
Giants
Attack: ★★☆☆☆
Health: ★★★★☆
Low damage, high health troops. Used to draw enemy fire while your stronger troops take down enemy buildings. Primarily used for loot raids, but can also be used in place of golems in war if you need to cut a small funnel and want to dedicate more of your troop space to offense. Giants can pair well with small groups of healers.
Goblins
Attack: ★★★☆☆
Health: ★☆☆☆☆
A raiding troop that targets the nearest collector, storage, or town hall and does double damage to it. Very squishy and easy to kill, but does incredible damage to collectors, storages, and town halls. Strictly a raiding troop. Some pro-Clashers will actually carry a small handful of goblins (less than 5) to help cleanup buildings after defenses have been taken down, because they deal such high damage to their target buildings. But other than that, goblins should not be used in any significant number in war.
Wallbreakers
Attack: ★☆☆☆☆
Health: ★☆☆☆☆
This unit only has one use, and that's to break walls. Most effectively used when dropped in pairs, as 2 wallbreakers can take down most walls. They can be killed in one shot by mortars though, so try to time your wallbreaker drops inbetween mortar fire. Do not carry too many wallbreakers, because they are a dispensable unit and they can take up quite a bit of space that could be better used towards offense. A good number to carry for each war attack is between 2 and 7.
Balloons
Attack: ★★★★★
Health: ★★☆☆☆
This unit can be viable at level 5 for TH8, but when it gets upgraded to level 6, there is an enormous jump in damage and health. Balloons are either used as a third-stage cleanup troop to help eliminate defenses after the core has been invaded and air defenses have been taken down, or they are paired with lava hounds to take down enemy bases. They are very slow but deal very high damage. Using rage or haste spells on balloons is highly recommended to compensate for their lack of speed.
Healers
Attack: ☆☆☆☆☆
Health: ★★★☆☆
Healers work best in groups, and I find a team of about 4 healers to be very effective at keeping a target alive. 1 or 2 healers on their own will have little effect in keeping units alive. Healers work best when they focus on the archer queen, teams of giants (10 or more), or on pekkas and valkyries. The healers main weakness is the air defense, but blowers can also interfere heavily with healers by making them temporarily stop healing their target, or having them change targets altogether. Healers are often used on archer queens in areas of enemy bases that are far from air defenses and blowers, where the archer queen can go on an invincible rampage, and the rest of the army is deployed once the archer queen has destroyed a sizable chunk of the base (this is called a "queen walk" attack). Placing a rage spell on healers will actually increase their healing power, so using rage on healers can help them keep the queen or other units alive during intense firefights.
Wizards
Attack: ★★★★★
Health: ★★☆☆☆
Very high damage but low health troop. Needs the protection of giants, golems, or other high health "tanks" to keep the wizards alive as they rain damage upon buildings. Very commonly used in war attacks to create funnels by destroying sections of the perimeter to guide your other troops into the core. Wizards are weak to splash damage from mortars and wizards towers, and giant bombs will kill them instantly. For this reason, it is very bad to clump up all your wizards together. Don't put all your eggs in one basket, always be sure to give your wizards a little bit of space.
Dragons
Attack: ★★★★☆
Health: ★★★☆☆
High damage, high health troop. An essential war troop at TH8. The only true weakness a dragon has is to air defense buildings, which can take down dragons very quickly. Most dragon attacks revolve around eliminating as many air defenses as possible, and deploying dragons en masse to sweep the base. Dragons see much less use in TH9 and above, but they make excellent defense troops in the clan castle at all levels.
Pekkas:
Attack: ★★★☆☆
Health: ★★★☆☆
A unit with a good balance of high damage and high health, commonly used in wars. They are immune to spring traps and are resistant against wizards towers and mortars. Their primary weakness is their slow movement speed and slow attack speed. Try to compensate for their slow attack speed by spacing out your pekkas, try your best not to have them target the same buildings.
Minions:
Attack: ★★★☆☆
Health: ★★☆☆☆
An air unit with relatively high damage output. Commonly used in loot raids or trophy raids (with balloons), but seldom used in war. Can be used in place of wizards in war to create funnels in areas with no defense against air troops.
Hogs:
Attack: ★★★★☆
Health: ★★★☆☆
A pretty powerful troop that specifically targets only defense buildings until they have all been destroyed. Hogs can be used as a third-stage cleanup troop, as a hit-squad to eliminate an air defense for dragon attacks, or can be used en masse as a war attack. Heals are essential to keeping hogs viable throughout the attack, so never attack without a good stock of heal spells. Hogs can be vaporized by two adjacent giant bombs (dgb: double giant bomb). DGBs will eliminate any hogs caught in the blast, even a heal spell cannot save them from this, so watch out for empty compartments that have enough space to potentially have a DGB.
Valkyries:
Attack: ★★★★★
Health: ★★☆☆☆
Like a deadly tornado, they move swiftly and unpredictably and leave everything in ruin in their wake. The latest update has made these arguably the best unit in the game. Their offense and ability to attack two buildings more than compensate for their moderately low health. Valkyries must be used in groups of at least 6 or more to be effective, 1 or 2 valkyries on their own will not do much at all. Unlike most other troops, you'll want to keep all your valkyries together, do not spread them apart.
Golems:
Attack: ★☆☆☆☆
Health: ★★★★★
The frontline tanks, these units have enormous health that will absorb enemy fire for a very long time so you can deploy your other troops to attack in safety. Golems are immune to spring traps, unlike giants, and will explode into smaller golems once destroyed, making golems superior to giants. The only drawbacks to the golem are its very low attack and very slow speed. They cannot be relied on to take down buildings, their only purpose is to draw enemy fire away from your more offense heavy troops. Golems are usually best deployed spread out rather than grouped together, so they can distract more enemy defenses.
Witches:
Attack: ★☆☆☆☆
Health: ★★☆☆☆
A very fragile troop that deals very low damage, the witch's power comes from summoning hordes of skeleton troops. Swarms of skeletons can deal lots of damage, and can be used to distract enemy defenses by overpowering them in number. Witches usually work best in groups, but don't keep them too close together, or else traps and splash damage from wizard towers and mortars will wipe your witches quickly. The latest update made it so that skeletons no longer trigger traps, and it used to be that the skeletons would run ahead of the witch and trigger giant bombs before the witch would reach them. With this new change, the witch is now much harder to keep alive, so this troop is now seldom used in the war community.
Lava Hound:
Attack: ★☆☆☆☆
Health: ★★★★★
Golems of the skies. These units will fly to the nearest air defense to distract it (and any other defenses along the way) so that your other air troops can be deployed in relative safety. Lava hounds have ridiculously low attack power (they deal less damage than a single archer!). But when they die, they explode into a group of lava pups, which are very similar in attack and health to minions. Lava hounds are usually paired with balloons to make a killer combo.
Spells
Lightning:
Lightning spells drop 6 lightning bolts in a semi-random pattern around the point you drop them, and they are best used when dropped on the very center of a building you are targeting. Lightning spells are usually used to destroy air defenses. You can use 3 lightning spells, or 2 lightning spells and an earthquake to destroy an air defense.
Heal:
A very powerful spell, heals can make your troops almost invincible while they are inside. Heals are best used on units with high attack but low health, like hogs, wizards, and valkyries. Be advised, troops that are being targeted by an inferno tower cannot be healed.
Rage:
This spell boosts the movement speed and damage of any troops inside. It is a very useful spell that can be used to enhance any attack. If your troops are having trouble getting through a wall, a rage spell can temporarily turn them into "wallbreakers" to bust through to where they need to go. Rage works best on valkyries and balloons, which will temporarily make groups of them into wrecking balls.
Jump:
This spell temporarily "erases" a small area of walls, so that your troops can move through a base much faster. Jump spells are best used on walls deep inside a base, wallbreakers are best used on walls around the perimeter. Jump spells can be used tactically to direct troops into the compartments you want, so think best about where you want to place your jump.
Freeze:
This spell is available at TH9, but it should only be used against TH10 bases. The freeze spell is only useful against inferno towers, so if you are up against a base without inferno towers, you're better off using a different spell other than freeze. Inferno towers work by dealing low, continuous damage and then increasing that damage exponentially over time. Using a freeze spell helps disrupt that increasing damage, forcing the inferno to start ramping up its damage again from scratch. It's best to drop freezes about 3-5 seconds after the enemy's inferno towers have started targeting your troops.
Poison:
This spell works much like an inferno tower. It deals very low damage to begin with, but the damage increases exponentially over time. Try to drop these on enemy troops as early as possible, so the poison spell has time to build up to full power. If you can predict where the enemy's clan castle troops will engage your own troops, you can drop your poison spell there early to build up damage faster. Keep in mind, enemy troops in a poison spell will run away if there are no other troops on the battlefield. Also, poison spells do NOT stack on top of each other. Only drop them one at a time if you have 2 poisons.
Earthquake:
This spell reduces the health of all buildings (except storages) in a small area by a certain percentage. This spell is best used against buildings with very high hitpoints, like townhalls, clan castles, xbows, and inferno towers. If those buildings are clumped together, dropping an earthquake on them will help your troops to tear them down faster. 4 earthquakes of any level will destroy any enemy walls caught in the area. Earthquakes cover a larger area than jump spells and will destroy the walls permanently, so sometimes it's better to use 4 earthquakes over a jump spell.
Haste:
This spell increases the movement speed of any troops in it. It's like a rage spell, but it does not increase troop damage, just speed. In my experience, I have found haste spells to only be effective on balloons. So unless you are using balloons, it's not recommended to use this spell for your attacks.
Friday, April 15, 2016
Goblin Video
Saw this interesting video of a guy using mass goblin attacks to farm dark elixir from high lvl TH10s:
https://youtu.be/txxugXV9Wiw
I might need to start giving goblins another shot.
https://youtu.be/txxugXV9Wiw
I might need to start giving goblins another shot.
Thursday, April 14, 2016
Trophy Leagues
Bronze and Silver Leagues
This league is filled with players in lower TH levels who are in the early stages of Clash. It would be a waste of time (and gold) to drop trophies all the way down to here, because trophy-droppers will knock you right back up into higher leagues as soon as you log off, and the loot down here is not very spectacular.
Gold League
I refer to this league as "gen pop". This is where a majority of Clashers reside, and it's overall the best place to "farm" for gold and elixir. The bases generally aren't very well developed and are pretty easy to raid, and you have a pretty good chance at stumbling across inactive bases with loot still pooled up in the collectors. If you're looking to upgrade walls or defenses, or save up elixir for troop research, this is the place to be. I have been finding the 1600 trophy mark to be a pretty good spot for finding good loot here.
Crystal League
You'll notice a strong shift in difficulty in the bases here. This is the best place to farm for dark elixir, but I would only recommend this league for players TH9 and up. For TH8, you're better off trying to raid for dark elixir in gold. But once you hit TH9 and you have upgraded camps, troops, and spells, you can start hitting the harder bases with bigger stashes of dark elixir. You can pretty easily find bases with 1,500 - 3,000 dark elixir here, which will help fund those dark troop and hero upgrades. If you're looking to score gold and elixir, however, you should stay down in Gold, where the difficulty-to-payoff ratio is much better.
Masters League
If you're looking to improve yourself in wars, this is the place to be. Nothing but the cream of the crop here, well designed bases and players who know what they are doing. Come here when you're trying to perfect your three-star attacks and strategy. Watch replays on your own base being attacked to see how the pros do it. But be warned, you will not be making any money here. In fact, you'll probably lose more elixir/dark elixir than you win back, because you need to make full war armies every time you attack. I've spent about 2 weeks here perfecting new valkyrie strategies, and I started with 110,000 dark elixir and I'm now down to 60,000 dark elixir. So if you're in this league, don't plan on making money or putting your builders to work, this is the place to put your base progression on hold while you test your skills and become a better fighter.
Champion League and Above
If you're in champs or higher, you don't need to be reading this, you should be blogging yourself to help inform the rest of us!
Quick Summary:
Bronze/Silver: Don't bother
Gold: Best place to find gold and elixir to upgrade defenses, walls, and lab upgrades
Crystal: Best place to find dark elixir to upgrade heroes and dark troops
Masters and Above: Best place to fight and improve, worst place to earn money
Tuesday, April 12, 2016
Funneling In Depth
My first post gave a basic overview of how to do a simple funnel, but this post will go into much MUCH more detail about the finer points of funneling. It is highly recommended to read my posts on basic funneling (http://carpedeeznutz.blogspot.com/2016/04/funneling-troops.html) and on multi-stage attacks (http://carpedeeznutz.blogspot.com/2016/04/multi-stage-attacks.html) before reading this.
Choosing the Direction of Your Funnel
Let's use the following base as an example:

Since the town hall is in the exact center and the base is pretty symmetrical all around, it would seem like you could attack from any direction and it wouldn't really matter. But there are some considerations to take in mind when choosing where to strike from:
1) Strike to engage the clan castle troops early. The enemy's clan castle troops can be one of the toughest obstacles on a base, and it should always be dealt with head on. The base above should be attacked either from the top left or top right, or directly from the top to engage the enemy clan castle troops early when your army is at its strongest. Let's see what happens if we attacked this base from the bottom vs. from the top:
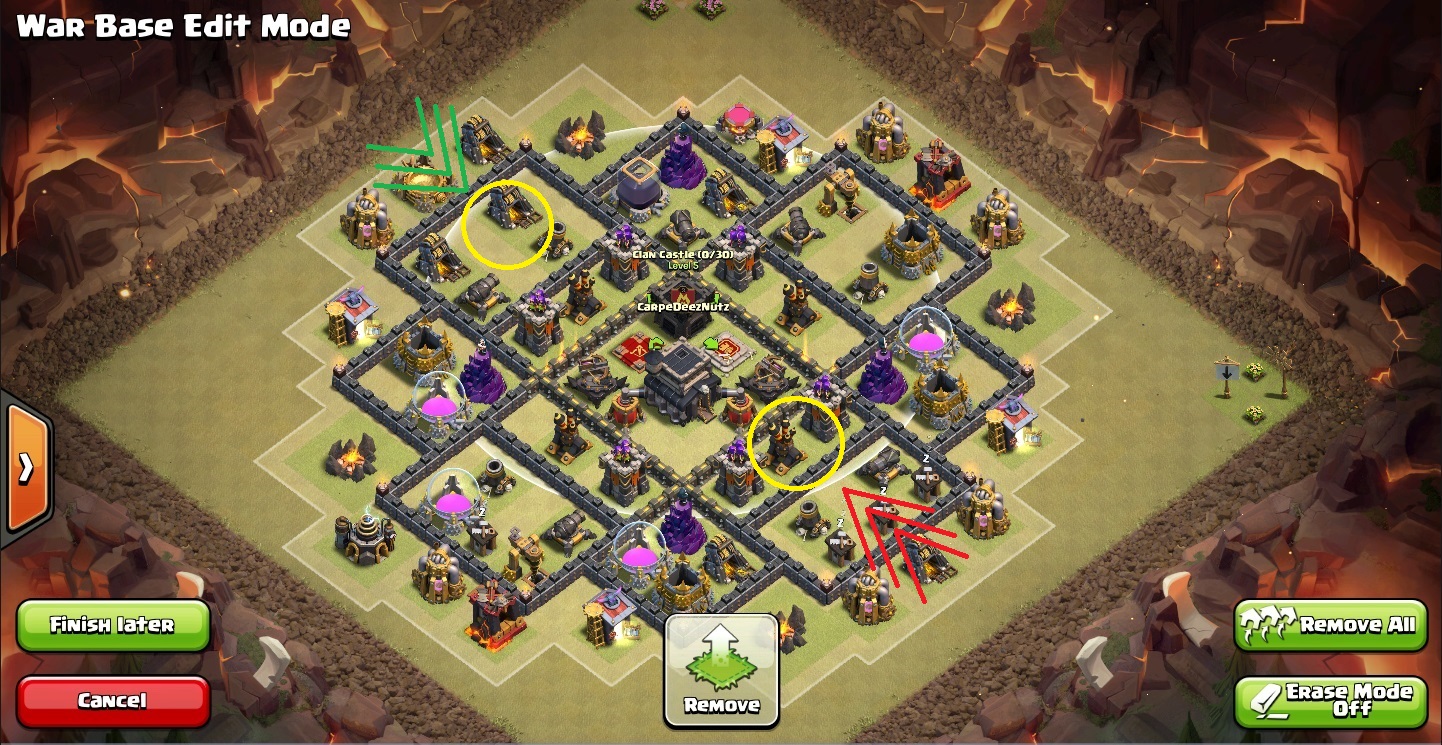
The clan castle's trigger range is indicated by the large faint white circle. When your troops enter that range, the enemy's clan castle troops will deploy to engage your troops. If you attack from the top left, indicated by the green arrows, the battle between your troops and the enemy clan castle troops will happen at the yellow circle. At this area, close to the perimeter of the base, nearby wizards used for funneling will likely be alerted and move towards the enemy's troops to fight them, helping to take them down faster. If you have a queen, she will likely be nearby at this stage too to help as well. Now, when you attack from the bottom right, a different story emerges. Your troops will enter the trigger range much later in the attack and deeper in the base. Any funneling wizards you first dropped may have veered off towards other perimeter buildings and are too far away to help, or may have been destroyed when they reached this deep into the base. If your queen did not funnel correctly (and she is very difficult to funnel), she may be attacking buildings along the perimeter and may also be too far away to help. If your kill squad was composed of valkyries or pekkas, and the enemy had a dragon in the base, it would relentlessly roast your valkyries or pekkas and your ground troops would be helpless to stop it. Always do your best to avoid this scenario, and fight the enemy clan castle early when you have the best chance of defeating it quickly.
2) Strike to destroy the enemy queen early (only at TH9 and above). The enemy queen is second behind the enemy clan castle in terms of deadliness to your troops. If you are planning a three-stage attack with hogs or balloons to clean up, the queen MUST be destroyed first. The queen will absolutely rip through hog or balloon armies, and she (and the clan castle) must always be destroyed first before deploying hogs or balloons. No exceptions to this. If hogs or balloons are a major component to your attack, the clan castle troops and queen must be eliminated first.
3) Strike the strongest side of the base first/the side of the base with the most defenses. Most attacks will start with golems being deployed first, and the golem's primary purpose is to act as a distraction to absorb enemy fire while your other troops rain damage down. If the enemy's base has an uneven distribution of defensive buildings (one side of the base may have more archer towers and cannons for example), then attack the strongest side first. Your golems will distract more defenses, which is what the golem was made for, and hopefully your wizards and kill squad will take out these defenses while they are slowly chiseling away at your golems. Your golems will often not travel far from where they are dropped, so it's very unlikely your golems will ever reach the back-side of the base to distract any defenses there. And your other troops are much faster, so they will probably be taking fire by defenses on the backside of the base way before your very slow golems get there. Attacking the strongest side first also leaves the back-side (the weaker side with fewer defenses) easier to take down with your third-stage troops, such as your hogs or balloons.
So in summary:
1) Strike to engage the clan castle troops early
2) Strike to destroy the enemy queen early (only at TH9 and above)
3) Strike the strongest side of the base first/the side of the base with the most defenses
Sometimes, a base will be designed where you can't follow all 3 of these rules. The enemy clan castle might be on the opposite side of where the queen is located, for example. When this happens, try to follow the rules in order of priority as best you can. One trick I also like to use to deal with this is to lure the enemy clan castle troops out with a giant or hog first, and then attack the queen side. The enemy's clan castle troops will move towards your battle at the queen side of the base and you can resume your attack normally from there. This technique sacrifices 5-10 troop space worth of troops (a giant or hog, sometimes two), but the technical advantage it provides can be well worth it. The following picture provides an example of how this is done:

The clan castle is north of the town hall and the queen is south of the town hall in the picture above. So a hog is first dropped at the top left, where it will seek out the nearest defense, either the cannon or mortar nearby. This hog will enter the range of the clan castle and the enemy's troops will come out and kill the hog. You then begin attacking from the south to destroy the queen, and the enemy troops will come down to you and you can deal with the queen and enemy clan castle at the same time.
Envisioning the Funnel
Now that we have a better understanding of what direction we want to attack from, we can now envision the best way to make our funnel. First, we must picture the path your troops will take around the perimeter if you do not make any attempt at funneling:

The green line shows the likely path your troops will take if you do not use any funneling techniques. They will destroy one building, then move on to the next in line around the perimeter. Now, let's decide a direction we want to funnel from. Let's say, we want to invade from the top left, to engage the enemy clan castle and queen head on:

Now, to make the funnel, we must break off several links on each side of the chain that surrounds the perimeter of the base.

The picture above shows how to make a simple, but effective funnel to attack from the top left. Just destroy a few links in the chain and your troops will have no choices but to move in rather than around your base. You'll notice that three buildings in the center of my intended funnel direction were not selected to be destroyed for the funnel. These buildings give your troops something to "latch" on to first before moving into the base. If I destroyed those three buildings first, then the kill squad would have likely tried to walk farther away to another perimeter building instead, like so:

If I destroyed those three buildings at the start of my funnel first, the kill squad would walk towards the army camp or barracks and would have continued the walk of shame. So remember to destroy a few buildings on either side of your funnel, but to leave some buildings in the center of your funnel intact so that your kill squad will have something to target and help guide it into your funnel.
When making a funnel, also consider that there are different sizes of funnels you can make. You can make a very narrow funnel with just a golem and 4 wizards, or you can make a very wide funnel with 2 golems and 5 or 6 wizards on either side. The advantage of a narrow funnel is that you have more army space dedicated to your kill squad. But the very wide funnel can help to prevent kill squad troops from walking out of a base and back to the perimeter. Valkyries usually require large funnels because they are prone to walking in and out of bases, but of course it can happen to pekkas as well. Each base must be examined individually to determine if it needs a wide funnel or if a narrow one will suffice, as some bases are much easier to funnel than others (the bases pictured above would be considered very easy to funnel).
Wizard Drop Direction
The direction and order you drop your funneling wizards will determine the flow of your wizards into or out of the funnel. Let's look at some examples:

Let's pretend I wanted to funnel the base above from the 12 o'clock position. I would drop my golems first (this should be a given by now. Golems before wizards, always) and I drop my wizards in the order indicated above. I drop them simultaneously on either side, with the first wizards closest to my funnel and each additional wizard being dropped further away from my funnel. Dropping it in this order will cause the wizards to drift outward, away from the funnel and out towards the other perimeter buildings:

Now, if I reverse the order and drop in the wizards from the far side moving in, the wizards will flow into my funnel as they destroy their buildings and move on:

By dropping the wizards in this order, they will flow into my funnel rather than away from it, and they will move with or behind the kill squad troops into the core of the base.
Now, is one method better than the other? No, it all depends on the layout of the base and what you want your wizards to do. If you want your wizards to move along the perimeter expanding the funnel, drop them from the inside of your funnel and drop them progressively outwards. Having wizards move away from the funnel can also be beneficial for destroying any defenses that happen to be along the perimeter, yet still distracted by your golem or potentially to be distracted by your kill squad as the attack progresses. If you want your wizards to move into the core of the base to back up your kill squad though, drop the wizards further from your funnel and drop each one progressively inwards towards your funnel.
The technique for controlling an inward or outward flow of your funneling wizards is not 100% precise. It works best when you drop them down in a slower, more controlled manner, with a half-second or full-second pause between each drop, rather than throwing them down super fast and almost instantaneously. It also works better if the health of the perimeter buildings your wizards are dropped next to are approximately the same. But nonetheless, this is a very fine detail that can really control the flow of your attack, so be sure to practice it and consider how you want your wizards to move as your attack progresses.
Choosing the Direction of Your Funnel
Let's use the following base as an example:
Since the town hall is in the exact center and the base is pretty symmetrical all around, it would seem like you could attack from any direction and it wouldn't really matter. But there are some considerations to take in mind when choosing where to strike from:
1) Strike to engage the clan castle troops early. The enemy's clan castle troops can be one of the toughest obstacles on a base, and it should always be dealt with head on. The base above should be attacked either from the top left or top right, or directly from the top to engage the enemy clan castle troops early when your army is at its strongest. Let's see what happens if we attacked this base from the bottom vs. from the top:
The clan castle's trigger range is indicated by the large faint white circle. When your troops enter that range, the enemy's clan castle troops will deploy to engage your troops. If you attack from the top left, indicated by the green arrows, the battle between your troops and the enemy clan castle troops will happen at the yellow circle. At this area, close to the perimeter of the base, nearby wizards used for funneling will likely be alerted and move towards the enemy's troops to fight them, helping to take them down faster. If you have a queen, she will likely be nearby at this stage too to help as well. Now, when you attack from the bottom right, a different story emerges. Your troops will enter the trigger range much later in the attack and deeper in the base. Any funneling wizards you first dropped may have veered off towards other perimeter buildings and are too far away to help, or may have been destroyed when they reached this deep into the base. If your queen did not funnel correctly (and she is very difficult to funnel), she may be attacking buildings along the perimeter and may also be too far away to help. If your kill squad was composed of valkyries or pekkas, and the enemy had a dragon in the base, it would relentlessly roast your valkyries or pekkas and your ground troops would be helpless to stop it. Always do your best to avoid this scenario, and fight the enemy clan castle early when you have the best chance of defeating it quickly.
2) Strike to destroy the enemy queen early (only at TH9 and above). The enemy queen is second behind the enemy clan castle in terms of deadliness to your troops. If you are planning a three-stage attack with hogs or balloons to clean up, the queen MUST be destroyed first. The queen will absolutely rip through hog or balloon armies, and she (and the clan castle) must always be destroyed first before deploying hogs or balloons. No exceptions to this. If hogs or balloons are a major component to your attack, the clan castle troops and queen must be eliminated first.
3) Strike the strongest side of the base first/the side of the base with the most defenses. Most attacks will start with golems being deployed first, and the golem's primary purpose is to act as a distraction to absorb enemy fire while your other troops rain damage down. If the enemy's base has an uneven distribution of defensive buildings (one side of the base may have more archer towers and cannons for example), then attack the strongest side first. Your golems will distract more defenses, which is what the golem was made for, and hopefully your wizards and kill squad will take out these defenses while they are slowly chiseling away at your golems. Your golems will often not travel far from where they are dropped, so it's very unlikely your golems will ever reach the back-side of the base to distract any defenses there. And your other troops are much faster, so they will probably be taking fire by defenses on the backside of the base way before your very slow golems get there. Attacking the strongest side first also leaves the back-side (the weaker side with fewer defenses) easier to take down with your third-stage troops, such as your hogs or balloons.
So in summary:
1) Strike to engage the clan castle troops early
2) Strike to destroy the enemy queen early (only at TH9 and above)
3) Strike the strongest side of the base first/the side of the base with the most defenses
Sometimes, a base will be designed where you can't follow all 3 of these rules. The enemy clan castle might be on the opposite side of where the queen is located, for example. When this happens, try to follow the rules in order of priority as best you can. One trick I also like to use to deal with this is to lure the enemy clan castle troops out with a giant or hog first, and then attack the queen side. The enemy's clan castle troops will move towards your battle at the queen side of the base and you can resume your attack normally from there. This technique sacrifices 5-10 troop space worth of troops (a giant or hog, sometimes two), but the technical advantage it provides can be well worth it. The following picture provides an example of how this is done:
The clan castle is north of the town hall and the queen is south of the town hall in the picture above. So a hog is first dropped at the top left, where it will seek out the nearest defense, either the cannon or mortar nearby. This hog will enter the range of the clan castle and the enemy's troops will come out and kill the hog. You then begin attacking from the south to destroy the queen, and the enemy troops will come down to you and you can deal with the queen and enemy clan castle at the same time.
Envisioning the Funnel
Now that we have a better understanding of what direction we want to attack from, we can now envision the best way to make our funnel. First, we must picture the path your troops will take around the perimeter if you do not make any attempt at funneling:
The green line shows the likely path your troops will take if you do not use any funneling techniques. They will destroy one building, then move on to the next in line around the perimeter. Now, let's decide a direction we want to funnel from. Let's say, we want to invade from the top left, to engage the enemy clan castle and queen head on:
Now, to make the funnel, we must break off several links on each side of the chain that surrounds the perimeter of the base.
The picture above shows how to make a simple, but effective funnel to attack from the top left. Just destroy a few links in the chain and your troops will have no choices but to move in rather than around your base. You'll notice that three buildings in the center of my intended funnel direction were not selected to be destroyed for the funnel. These buildings give your troops something to "latch" on to first before moving into the base. If I destroyed those three buildings first, then the kill squad would have likely tried to walk farther away to another perimeter building instead, like so:
If I destroyed those three buildings at the start of my funnel first, the kill squad would walk towards the army camp or barracks and would have continued the walk of shame. So remember to destroy a few buildings on either side of your funnel, but to leave some buildings in the center of your funnel intact so that your kill squad will have something to target and help guide it into your funnel.
When making a funnel, also consider that there are different sizes of funnels you can make. You can make a very narrow funnel with just a golem and 4 wizards, or you can make a very wide funnel with 2 golems and 5 or 6 wizards on either side. The advantage of a narrow funnel is that you have more army space dedicated to your kill squad. But the very wide funnel can help to prevent kill squad troops from walking out of a base and back to the perimeter. Valkyries usually require large funnels because they are prone to walking in and out of bases, but of course it can happen to pekkas as well. Each base must be examined individually to determine if it needs a wide funnel or if a narrow one will suffice, as some bases are much easier to funnel than others (the bases pictured above would be considered very easy to funnel).
Wizard Drop Direction
The direction and order you drop your funneling wizards will determine the flow of your wizards into or out of the funnel. Let's look at some examples:
Let's pretend I wanted to funnel the base above from the 12 o'clock position. I would drop my golems first (this should be a given by now. Golems before wizards, always) and I drop my wizards in the order indicated above. I drop them simultaneously on either side, with the first wizards closest to my funnel and each additional wizard being dropped further away from my funnel. Dropping it in this order will cause the wizards to drift outward, away from the funnel and out towards the other perimeter buildings:
Now, if I reverse the order and drop in the wizards from the far side moving in, the wizards will flow into my funnel as they destroy their buildings and move on:
By dropping the wizards in this order, they will flow into my funnel rather than away from it, and they will move with or behind the kill squad troops into the core of the base.
Now, is one method better than the other? No, it all depends on the layout of the base and what you want your wizards to do. If you want your wizards to move along the perimeter expanding the funnel, drop them from the inside of your funnel and drop them progressively outwards. Having wizards move away from the funnel can also be beneficial for destroying any defenses that happen to be along the perimeter, yet still distracted by your golem or potentially to be distracted by your kill squad as the attack progresses. If you want your wizards to move into the core of the base to back up your kill squad though, drop the wizards further from your funnel and drop each one progressively inwards towards your funnel.
The technique for controlling an inward or outward flow of your funneling wizards is not 100% precise. It works best when you drop them down in a slower, more controlled manner, with a half-second or full-second pause between each drop, rather than throwing them down super fast and almost instantaneously. It also works better if the health of the perimeter buildings your wizards are dropped next to are approximately the same. But nonetheless, this is a very fine detail that can really control the flow of your attack, so be sure to practice it and consider how you want your wizards to move as your attack progresses.
Monday, April 11, 2016
Small Bomb Traps
Probably one of the most commonly misunderstood traps in the game is the small bomb trap. They have exceptionally low damage and can't even kill an archer. Most people find them utterly useless and do not upgrade them, or will throw them around randomly on their base. Some will try to lump 3 or 4 of them together to give them a little more punch. This is, however, not the way this trap was meant to be used. The small bomb trap has one sole purpose: killing wallbreakers. And to kill wallbreakers, they need to be placed:
1) In areas that people normally try to enter your base from
2) One tile space away from your walls
Take the following picture:

This picture is from a replay of my base being attacked. There's a narrow gap between my barracks and elixir collector where people usually tend to send bombers in, so I placed a small bomb there. You need to place a one-tile gap between the bomb and the wall, however, for the bomb to be effective. The reason being that the small bomb has a one-second delay, and if you place it too close to your wall, the wallbreaker will explode before your small bomb has a chance to kill it. By placing it further away from the wall, the wallbreaker will trip your bomb earlier, allowing it to go off before the wallbreakers detonate themselves.
In my experience, the small bombs do not work perfectly to kill off wallbreakers. In the picture above, 2 of the wallbreakers did manage to explode, but the other 2 did not. Ultimately, it was enough to keep my wall intact, and it did delay the enemy's kill squad longer than they were probably expecting. So please keep in mind when designing your base that the small bombs are meant to be placed at locations where you expect your opponent to enter from to kill wallbreakers. Sometimes these little traps can throw off an enemy's funnel and help to defend your base a little better.
Good TH9 War Layout

This TH9 war layout seems to be pretty good at resisting 2 or 3 star attacks. What makes this base tricky is the empty compartments that surround the townhall and xbows. Remember how troops are resistant to attack walls to reach a building? Well, they're twice as resistant to break through two layers of walls to reach one building, so this base has a core that essentially gets ignored by most ground troops until the very end. The xbows inside are also set to ground mode/long-range, so they will relentlessly hammer at everything around the base from a safe distance. The clan castle is also nested very deeply and cannot be lured out conventionally. All these components make this a tough base to tackle. Of course, not every base is impenetrable, and this base could have been beat with a jump spell or quadruple-quake to open up those empty compartments protecting the core. The base is also susceptible to lavaloon attacks because the xbows are set to ground only. Still, if you're looking to try out a new TH9 base layout for war, you might want to consider this one.
Saturday, April 9, 2016
Choosing Your Troops
Pekkas vs. Valkyries
Generally, I find valkyries to be superior to pekkas. They have much faster movement speed, they can attack two buildings at once, and they generally take down buildings much faster than pekkas.
However, pekkas have their advantages as well: they are immune to spring traps, they have much higher health, and they hold up well against giant bombs and wizards towers (unlike valkyries).
So, how do you pick which one to use? For me, the deciding factor is whether or not the enemy base is built with well placed spring traps. Take this base for example:

The three white circles highlight one-space gaps in walls, which 99% of the time means there's a spring trap there. The two white lines highlight narrow lanes which are also usually filled with spring traps. Since a base can have a total of up to 6 spring traps, a kill squad of 8 valkyries can be flung to pieces easily if all six or even half of the spring traps gets your valkyries. For this specific base, a pekka is highly recommended, because pekkas are too heavy to trigger springs.
Another factor to include in the decision of pekkas vs. valkyries is whether or not the buildings are spaced far apart, or very tightly clustered in your enemy's base. If all or most buildings are spaced out and not touching one another, the valkyrie advantage of hitting two buildings at once is negated and pekkas becomes a more favorable choice. If the enemy has a very concentrated and tightly grouped base, valkyries are recommended, because they can rip up 2 buildings simultaneously AND because rage and heal spells will cover more buildings for the valkyries to stay under.
The last factor to include in deciding whether to use pekkas or valkyries is funnel difficulty. Pekkas are much easier to funnel than valkyries, because valkyries are willing to walk a longer distance than pekkas to avoid attacking walls. So to funnel a valkyrie squad, you need to make a larger funnel than you would for a pekka squad, eliminating 3 or 4 buildings on either side of your funnel. Valkyries are also notorious for going into a funnel and then running right back out to the perimeter again. The reason this happens is because valkyries will actively seek out buildings that are directly next to other buildings, so they can attack two at once. Sometimes valkyries will start pushing into a base, but they'll start working their way back out again because there are clusters of collectors or builders huts outside that draw them away. So valkyries are a little more unwieldy in this regard, and pekkas are usually easier to "steer" into your funnel.
So in summary:
Pekkas

Generally, I find valkyries to be superior to pekkas. They have much faster movement speed, they can attack two buildings at once, and they generally take down buildings much faster than pekkas.
However, pekkas have their advantages as well: they are immune to spring traps, they have much higher health, and they hold up well against giant bombs and wizards towers (unlike valkyries).
So, how do you pick which one to use? For me, the deciding factor is whether or not the enemy base is built with well placed spring traps. Take this base for example:
The three white circles highlight one-space gaps in walls, which 99% of the time means there's a spring trap there. The two white lines highlight narrow lanes which are also usually filled with spring traps. Since a base can have a total of up to 6 spring traps, a kill squad of 8 valkyries can be flung to pieces easily if all six or even half of the spring traps gets your valkyries. For this specific base, a pekka is highly recommended, because pekkas are too heavy to trigger springs.
Another factor to include in the decision of pekkas vs. valkyries is whether or not the buildings are spaced far apart, or very tightly clustered in your enemy's base. If all or most buildings are spaced out and not touching one another, the valkyrie advantage of hitting two buildings at once is negated and pekkas becomes a more favorable choice. If the enemy has a very concentrated and tightly grouped base, valkyries are recommended, because they can rip up 2 buildings simultaneously AND because rage and heal spells will cover more buildings for the valkyries to stay under.
The last factor to include in deciding whether to use pekkas or valkyries is funnel difficulty. Pekkas are much easier to funnel than valkyries, because valkyries are willing to walk a longer distance than pekkas to avoid attacking walls. So to funnel a valkyrie squad, you need to make a larger funnel than you would for a pekka squad, eliminating 3 or 4 buildings on either side of your funnel. Valkyries are also notorious for going into a funnel and then running right back out to the perimeter again. The reason this happens is because valkyries will actively seek out buildings that are directly next to other buildings, so they can attack two at once. Sometimes valkyries will start pushing into a base, but they'll start working their way back out again because there are clusters of collectors or builders huts outside that draw them away. So valkyries are a little more unwieldy in this regard, and pekkas are usually easier to "steer" into your funnel.
So in summary:
Pekkas
- Good balance of health and offense
- Immune to spring traps
- Resistant to giant bombs and wizard towers
- Easier to funnel/predict movement
- Better for widely spaced enemy bases
Valkyries
- Very high offense, low defense troop
- Can attack two buildings at once
- Weak to traps and wizard towers
- Difficult to funnel/predict movement
- Better for tightly grouped enemy bases
Hogs vs. Balloons
For three-stage attacks, hogs or balloons are usually used to eliminate the remaining defenses on the outer rim of the base. The primary factor is choosing which to use is the air defense placement. If all the air defenses are in a single compartment in the core, or if your kill squad will likely destroy all the air defenses on its march to the core, balloons are preferred. Take a look at the following base:
In the picture above, all the air defenses are in a single large compartment in the core. If you can funnel your kill-squad into that compartment, it should be easy to take them all down, and balloons can finish off the remaining defenses.
So, what advantages do balloons have over hogs? The balloons only real weakness is the air defense (same with dragons, air defenses are the only real thing that stand in their way). When you factor in traps that can harm balloons vs hogs, balloons easily have the advantage. Enemy bases can have a total of 4 black air bombs at TH9 (and only 2 black air bombs at TH8) and 4 red air bombs. Each black air bomb can only kill 1 balloon, and it takes about 3 red air bombs to kill a group of balloons (though most bases don't bunch up their red air bombs like that). Compare that with hogs' weaknesses. Hogs are weak to spring traps, and each spring trap can spring up to three hogs. With 6 total spring traps on a base, spring traps can eliminate up to 3 x 6 = 18 hogs in a worst case scenario (!). Black air bombs can only eliminate up to 2 or 4 balloons by comparison (1 bomb per balloon). Hogs are also weak to giant bombs, especially if two are next to each other, which most bases will do. It would take at least 3 red air bombs grouped together to wipe out a group of balloons, and most bases do not cluster their red air bombs together.
Balloons are, however, susceptible to skeleton traps set to air mode, because balloons have no way of fighting back against air troops. Hogs are weak to skeleton traps too, but once all the defensive buildings are cleared, they will attack the skeletons, so this gives hogs an advantage in this regard.
Balloons are, however, susceptible to skeleton traps set to air mode, because balloons have no way of fighting back against air troops. Hogs are weak to skeleton traps too, but once all the defensive buildings are cleared, they will attack the skeletons, so this gives hogs an advantage in this regard.
The other advantage balloons have over hogs is that they are an air unit, so they are immune to cannons, mortars, and the Barbarian King. That's essentially half as many defensive buildings that can hurt you compared to using hogs.
Attacking Base #6 (War vs. Fatal Females)
This is for Nat!
To attack this base, make the following:


To attack this base, make the following:
- 11 dragons
- 4 lightnings, 1 earthquake
- Request in clan castle: 1 max dragon, 1 earthquake
First, take out two air defenses with your spells. Start by dropping two earthquakes in between the air defenses and right on top of the town hall. Try to drop it exactly between the top and bottom air defense so that it hits both of them:
Next, use two lightning spells on the top air defense and the bottom air defense. It's very important to drop your lightnings dead center on the air defense to maximize the damage, so if you have a small phone, zoom in to drop the lightning on top of the air defenses:
After the two air defenses have been destroyed, only one will be left standing. Drop your troops according to the picture below. Drop dragons simultaneously at the points labeled 1, 2 and 3 in that order. Count 5-Mississippi (to give those first 6 dragons a head start on their funneling), and then drop ALL of your remaining troops in the areas marked by stars (drop all your dragons, your clan castle reinforcements, your king, and your queen, and spread them out just a little bit like the stars indicate).
If all goes well, they should all move straight to the right and take out that last air defense, and should clear the rest of the map as well. The most important part is making sure to drop those spells down accurately!
TH8 Dragon Attack Guide
Here's a handy guide to dragon attacks at TH8 (you can also go to this link to see the infographic: http://i.imgur.com/pErYLFg.jpg)
This is an older guide, so when it says to use 3 zaps (lightning spells) in a certain scenario, use 2 lightnings and an earthquake instead, and fill the remaining spell slot with a rage or heal.

This is an older guide, so when it says to use 3 zaps (lightning spells) in a certain scenario, use 2 lightnings and an earthquake instead, and fill the remaining spell slot with a rage or heal.
Army Compositions
Here are some army compositions that I use for my multistage attacks. The numbers of each unit are definitely open to experimentation, and can be adjusted to fit the base you are attacking. Spells can be adjusted to your play style as well. These are all just basic templates to work off of. This list is a work in progress, and I will update it for different TH levels whenever I get the chance. Please feel free to request any specific attack patterns and I will give you a troop composition and strategy to work off of.
GoWiPe (Golems, Wizards, Pekkas)
-The classic two stage attack. If funnel is set up correctly, you are essentially guaranteed two stars
-This is a good strategy to use if you're attacking a base that you are certain you cannot 3 star anyways, as this strategy maximizes your potential for 2-stars. In some rare cases, this attack can lead to a 3 star victory.
-Golems and wizards to create a funnel and kill clan castle troops, pekkas and king/queen kill squad to invade the core after funnel is established
TH8 (200 troop capacity)
- 2 golems
- 2 pekkas
- 19 wizards
- 7 wallbreakers
- Request a high level pekka for clan castle
- 2 rage/1 heal OR 2 heal/1 rage
- 1 poison and 1 earthquake (request one of these from teammates)
TH9 (220 troop capacity)
- 2 golems
- 3 pekkas
- 18 wizards
- 6 wallbreakers
- 1 archer
- Request a high level golem for clan castle (30 capacity)
- 2 rage/1 heal/1 jump OR 2 heal/1 rage/1 jump
- 1 poison and 1 earthquake (request one of these from teammates)
GoWiHoPe (Golems, Wizards, Hogs, Pekkas)
-A three stage variation of the classic two star attack that heavily increases the odds of getting a 3 star attack. This attack substitutes about half of your wizards for hogs to finish off the remaining defenses after the kill squad has invaded the core.
TH8 (200 troop capacity)
- 2 golems
- 2 pekkas
- 9 wizards
- 2 wallbreakers
- 10 hogs
- Request 5 high level hogs for clan castle (25 capacity)
- 2 heal/1 rage or 3 heals
- 1 poison and 1 earthquake (request one of these from teammates)
- Use heals strictly to keep your hogs alive. Heals will make hogs virtually invincible (except to spring traps and double-giant bombs). Place heal spells to cover as many defensive buildings as possible in the hogs path.
GoVaHo (Golems, Valkyries, Hogs)
-A three stage attack that substitutes the pekkas for valkyries. Attack is carried out in the same fashion as above
TH8 (200 troop capacity)
- 2 golems
- 5 valkyries
- 9 wizards
- 2 wallbreakers
- 12 hogs
- Request 3 high level valkyries and an archer for clan castle (25 capacity)
- 1 rage/2 heal
- 1 poison and 1 earthquake (request one of these from teammates)
GoVaLoon (Golems, Valkyries, Balloons)
-A three stage attack for bases with all its air defenses in a single compartment in the core. Uses balloons at the third stage after air defenses have been destroyed to wipe out remaining defenses.
TH8 (200 troop capacity)
- 2 golems
- 5 valkyries
- 9 wizards
- 2 wallbreakers
- 12 balloons
- Request 3 high level valkyries and an archer for clan castle (25 capacity)
- 2 rage/1 heal
- 1 poison and 1 haste (request one of these from teammates)
- Use 1 rage and 1 heal to boost your KS into the core and destroy all the air defenses, use your remaining rage and donated haste on balloons to attack remaining defenses
Thursday, April 7, 2016
Multi-Stage Attacks (Read the post about funneling below before reading this!)
The key to launching the perfect attack is to break up your attack into multiple stages.


The most popular attack, the GoWiPe (Golems, Wizards, Pekkas) is a two-stage attack. The golems and wizards are used to create the funnel: golems are dropped first to draw enemy fire, and wizards are dropped behind the golems to destroy specific buildings to create a funnel. Once the funnel has been created, pekkas are dropped in to advance into the core and eliminate defensive buildings and the town hall. At the game's core, this is the most basic and simple attack, and has a very high chance of netting 2 stars IF you funnel your pekkas correctly. If the pekkas do the "walk of shame" around the base, it'll likely be a one-star attack.
Other popular attacks are modeled after the Gowipe, and involve at minimum 2 stages:
The first stage is almost always to create the funnel, and the best troops to do that are the golem and the wizard. Why these two troops? Because the wizard has the highest damage per housing space ratio of any troop in the game, so wizards can take down buildings fast. But wizards are extremely fragile, so to compensate for the wizard's squishiness, golems are dropped down first to help shield the wizards from enemy fire, and golems are used because they have the highest health per housing space ratio of any troop in the game. Just makes sense to pair the highest damage troop with the highest health troop doesn't it?
The second stage is to move your remaining troops into the core after the funnel has been established. These troops are commonly called by the Clash community "The Kill Squad" (or KS for short). For Gowipe, your KS is your pekkas, clan castle reinforcements, and king (and queen if you have one). Other attack strategies simply swap out the pekkas in the kill squad for something else. GoWiVa uses valkyries in its KS, GoWiWi uses witches in its KS.
So that's how 2-stage attacks work: golems and wizards to make the funnel, a kill squad of strong troops to dive straight into the core. Unfortunately, 2-stage attacks usually result in only 2 stars. The KS, if funneled correctly, will eliminate the town hall and any defensive buildings along the way to the town hall. But usually, the remaining defenses on the opposite end of your funnel will hammer away at your remaining troops and kill your KS and any remaining golems and wizards:
The picture above shows the funnel being made, and the kill squad diving for the core to destroy the TH. When the KS hits the core (indicated by the green star), it will start taking fire from enemy buildings on the opposite end of the base, and the KS usually doesn't have enough health left by this point to wipe out the remaining defenses firing at them.
And that's where 3-stage attacks come into play.
3-stage attacks will use either hog riders or balloons to help finish off those last, pesky defensive buildings that stand in the way of your 2-star attack becoming a 3-star attack. The first two stages are carried out as described above, but a "cleanup crew" stage is added once the KS has entered the core.
In the picture above, once the KS has entered the core of the base and starts taking fire, hogs are dropped off at the far end of the base to target the remaining defenses. Once all the remaining defenses are wiped out, it's a run against the clock to destroy everything else before the timer runs out. Hogs are best deployed AFTER the defenses start firing at your KS. Your KS usually has a good pool of health, but your hogs are more fragile, so it's better to have the defenses distracted by your KS than to have them firing directly at your hogs.
Balloons can also be used as a third-stage troop on certain base layouts. If the air defenses are all clustered in the core, you can drop balloons after your KS has killed the air defenses. You can also use balloons to pick off lone cannons and mortars that are out of range of anti-air defenses. The choice of whether to use hogs or balloons will ultimately come down to what you are more comfortable with and what the base layout favors.
Using all the information above, you can design your 3-stage attack any way you want it:
-You can make a GoVaHo (Golems, Valkyries, Hogs): golems and wizards to make the funnel, a valkyrie kill squad to dive for the core, and hogs to target the last remaining defenses.
-You can make a GoPeLoon (Golems, Pekkas, Balloons): golems and wizards to make the funnel, a pekka kill squad to dive for the core and destroy enemy air defenses, balloons to pick off the remaining defenses
-You can make a GoGobHo (Golems, Goblins, Hogs): golems and wizards to make the funnel, goblins to rush into the core to their deaths, hogs to fruitlessly try to get a single star
Funneling Troops
To learn how to funnel troops, you first need to know how the troops "think". Most troops will attack any building without preference, but some troops will target specific structures, like how giants and hogs only attack defensive buildings. But the number one rule all troops will follow is this: attack the easiest building to reach. Oftentimes, this means they will attack the building closest to where you dropped them. BUT, if the closest building is behind a wall, most troops would rather walk to a farther away building rather than try to break down a wall.
Let's take a look at an example base:

This is a pretty typical base layout: multiple compartments/wall layers, town hall in the center, defensive buildings behind walls, and collectors and barracks lining the outer edge. Let's see what happens when we drop all of our troops in a single location:

If you dump all your troops in a single point, they will first attack the nearest perimeter building, and then move on to the next nearest perimeter building, and so on until they run out of perimeter buildings, at which point they will finally start attacking walls and working their way inside the base. We've seen this happen a million times before, the pekkas or valks or king "refuses" to go into the core, and they end up walking around the base getting shot at by all the defensive buildings. The reason they do this is because they are following the path of least resistance, and troops would much rather walk 6 tiles than attack a building behind a wall that's 2 tiles away. One way to help counter this is to use wallbreakers, quadruple-quake, or jump spells to break open walls. But the best way to direct your troops is through funneling.
To funnel this base is particularly easy, and can be done by eliminating the following buildings:

And that's all it takes to funnel! Just envision the path your troops will take as they stroll around the perimeter, and eliminate 2 or more buildings along that path. This will force your troops to stop following that path and move inward instead. Let's see what happens when we drop troops from the top of the map after we've eliminated those 4 buildings:

So, the troops will still go to the two storages at the top because they are closest to the drop point, but rather than following the white arrows and walking ALL the way around to hit the next storage lining the perimeter, they will attack the walls and start moving in (indicated by the green arrows). As lazy as troops are to attack walls, they are even lazier to walk that far to attack another building. For good measure, most troops will not choose to walk the span of two standard buildings. If I only eliminated one of the collectors or barracks on either side, the troops will most likely have walked a little further and continued walking around the perimeter. Remember, all the good stuff you want to destroy is nested deep inside the base, and you want to try your best to get your troops to NOT walk the circle of death around the perimeter of the base, where they will be destroying useless buildings like army camps, barracks, and collectors. Always funnel your troops into the core!
And in case you're wondering where the name "funnel" comes from:

Let's take a look at an example base:
This is a pretty typical base layout: multiple compartments/wall layers, town hall in the center, defensive buildings behind walls, and collectors and barracks lining the outer edge. Let's see what happens when we drop all of our troops in a single location:
If you dump all your troops in a single point, they will first attack the nearest perimeter building, and then move on to the next nearest perimeter building, and so on until they run out of perimeter buildings, at which point they will finally start attacking walls and working their way inside the base. We've seen this happen a million times before, the pekkas or valks or king "refuses" to go into the core, and they end up walking around the base getting shot at by all the defensive buildings. The reason they do this is because they are following the path of least resistance, and troops would much rather walk 6 tiles than attack a building behind a wall that's 2 tiles away. One way to help counter this is to use wallbreakers, quadruple-quake, or jump spells to break open walls. But the best way to direct your troops is through funneling.
To funnel this base is particularly easy, and can be done by eliminating the following buildings:
And that's all it takes to funnel! Just envision the path your troops will take as they stroll around the perimeter, and eliminate 2 or more buildings along that path. This will force your troops to stop following that path and move inward instead. Let's see what happens when we drop troops from the top of the map after we've eliminated those 4 buildings:
So, the troops will still go to the two storages at the top because they are closest to the drop point, but rather than following the white arrows and walking ALL the way around to hit the next storage lining the perimeter, they will attack the walls and start moving in (indicated by the green arrows). As lazy as troops are to attack walls, they are even lazier to walk that far to attack another building. For good measure, most troops will not choose to walk the span of two standard buildings. If I only eliminated one of the collectors or barracks on either side, the troops will most likely have walked a little further and continued walking around the perimeter. Remember, all the good stuff you want to destroy is nested deep inside the base, and you want to try your best to get your troops to NOT walk the circle of death around the perimeter of the base, where they will be destroying useless buildings like army camps, barracks, and collectors. Always funnel your troops into the core!
And in case you're wondering where the name "funnel" comes from:
Subscribe to:
Posts (Atom)